
The Ultimate Crispy Veggie Spring Rolls: A Crunchy Delight for Any Occasion
I still remember the first time I bit into a perfectly crispy veggie spring roll. It was in my grandmother’s cozy kitchen, where the air was filled with the mouthwatering aroma of sizzling oil and fresh vegetables. She always made the best spring rolls, and watching her create this culinary magic was enchanting. Fast forward to today, I’ve dedicated myself to mastering that same art, and let me tell you, I’ve come up with what I call the Ultimate Crispy Veggie Spring Rolls!
These rolls are not just any spring rolls; they’re special—crunchy on the outside, bursting with vibrant veggies on the inside, and oh-so-satisfying. What sets this recipe apart is the blend of rehydrated mushrooms and glass noodles, along with that secret touch of seasoning. It’s a perfect harmony of flavors and textures that’ll transport you back to that comforting childhood memory or create new ones with your loved ones.
In this post, I’ll walk you through every step of making these delightful spring rolls, from selecting the best ingredients to frying them to golden perfection. Whether you’re looking to impress your friends at a get-together or simply indulge in some comfort food at home, I promise you’ll learn how to make the ultimate crispy veggie spring rolls that everyone will rave about!
What Are Ultimate Crispy Veggie Spring Rolls?
Originating from Asia, spring rolls are a beloved street food staple, but these Ultimate Crispy Veggie Spring Rolls have a unique twist. They are filled to the brim with finely julienned vegetables like taro, cabbage, and carrots, along with earthy shiitake and black fungus mushrooms, which add a depth of flavor. The texture? Crisp on the outside and tender on the inside—an indulgent contrast in every bite.
The sheer versatility of spring rolls makes them perfect for any occasion, whether it’s a festive party, a casual family dinner, or even meal prepping for the week. They’re incredibly easy to customize with whatever vegetables you have on hand, and you can keep them plant-based or add in proteins like tofu or shrimp if you prefer. Whenever I make these, I’m reminded of the joy of sharing food and making memories with family and friends, and that’s what makes them truly special.
Why You’ll Love This Recipe
Crunchy Greatness: Unlike store-bought versions that can be soggy or bland, my Ultimate Crispy Veggie Spring Rolls have that perfect golden crunch that you simply can’t resist.
Quality Ingredients: When you make these at home, you control the ingredients. No preservatives or artificial flavors—just fresh, wholesome veggies and spices. This not only elevates the taste but also makes them healthier than many takeout options.
Cost-Effective: Let’s face it—eating out can add up quickly! With this recipe, you can whip up a big batch of satisfying spring rolls for a fraction of the cost you’d pay at a restaurant. Plus, you’ll likely have leftovers, which are perfect for snacking or light meals!
Endless Customization: Feel free to swap out the veggies for whatever you have. Love bell peppers? Toss them in! Prefer zucchini? Go for it! You can truly make this recipe your own and cater to dietary restrictions easily.
Family Fun: Making spring rolls is a fantastic activity to enjoy with family and friends. Gather the crew, set up a rolling station, and let everyone personalize their own rolls. Trust me, it’s a great bonding activity and perfect for laughter-filled evenings!

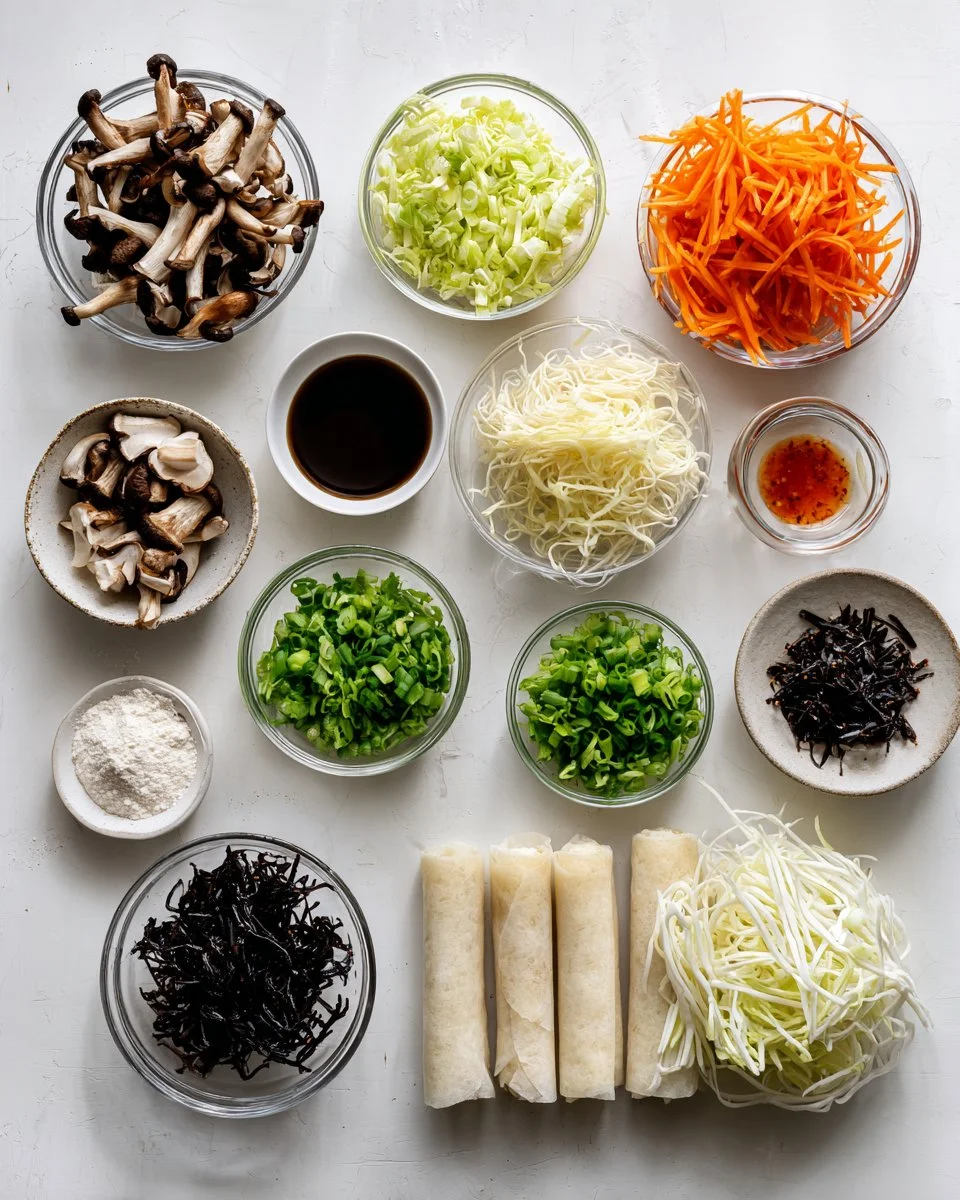
Ingredients
- 0.5 oz dried shiitake mushrooms, rehydrated (Look for high-quality varieties for maximum flavor)
- 0.25 oz dried black fungus mushrooms, rehydrated (Adds a unique texture; can be swapped out for additional shiitake if desired)
- 1.4 oz dry glass noodles (1 small pack, can be found in the Asian aisle)
- 2 tablespoon neutral oil (like canola or vegetable)
- 4 cloves garlic, minced (For that aromatic foundation)
- 1/2-1 teaspoon ground white or black pepper (Use as per your heat preference)
- 5.3 oz finely julienned taro root (Perfect for texture; avoid too much moisture)
- 5.3 oz finely julienned cabbage
- 4.3 oz packed julienned carrots (Choose fresh and vibrant for the best result)
- 2 tablespoon soy sauce (Use low-sodium for a healthier option)
- 1 tablespoon sugar (Balances the flavors beautifully)
- 1/4 teaspoon table salt
- 8-10 cilantro stems, finely chopped (Fresh herbs bring brightness)
- 2 green onions, chopped
- 12-14 large spring roll wrappers (Look for rice paper or wheat-based versions; I prefer rice paper for a gluten-free option)
- 1 tablespoon all-purpose flour or 1 egg for sealing the wrappers
- Vegetable oil for frying (Ensure deep enough for frying)
- Sweet chili sauce for dipping (You won’t regret this extra flavor punch!)
Ingredient Notes:
- Mushrooms: Make sure to properly rehydrate dried shiitake and black fungus mushrooms for optimum flavor.
- Glass Noodles: Soak them until soft but not mushy; add them to your filling last to maintain that delectable texture.
Step-by-Step Instructions
Prepare the Mushrooms: After soaking the dried shiitake mushrooms, squeeze out the excess water, and set them aside. In the same water, soak the glass noodles until softened (about 15-20 minutes).
Mix the Veggies: Chop the rehydrated mushrooms and combine them with julienned taro, cabbage, and carrots in a large mixing bowl.
Add the Noodles: Once the glass noodles are softened, drain them, cut into 2-inch pieces and toss them into your vegetable mixture.
Sauté for Flavor: In a pan, heat 2 tablespoons of neutral oil over medium heat. Add minced garlic and pepper, sautéing until golden and fragrant (about 2 minutes).
Cook the Vegetables: Add the vegetable mixture to the pan and cook, stirring frequently, until the taro is tender but not mushy (around 8-10 minutes).
Season the Mixture: Combine in the softened glass noodles, chopped cilantro, remaining soy sauce, sugar, and a splash of mushroom soaking water. Taste and adjust seasonings if necessary, then spread the filling on a plate to cool.
Wrap it Up: Prepare your spring roll wrappers according to package directions. Place a generous spoonful of filling in the center, fold the sides over the filling, and roll it tightly. Use a paste made from flour and water (or an egg) to seal the edges.
Fry or Bake: If frying, heat vegetable oil in a wok or deep pan until hot (about 350°F). Carefully add the spring rolls, a few at a time, frying until golden brown (approximately 2-3 minutes each side). For a healthier option, bake at 425°F until crispy, approximately 20 minutes, flipping halfway.
Serve: Drain on a paper towel and serve immediately with sweet chili sauce for dipping.
Chef’s Tips:
- Crispy Factor: Make sure your oil is hot enough before frying—if it’s not, your rolls will absorb too much oil and lack that delightful crunch.
- Common Mistakes: Don’t overfill your spring rolls; this can lead to bursting during frying.
Expert Tips & Tricks
Storage: If you have leftovers (which is rare!), keep them in an airtight container in the fridge for up to 3 days. To reheat, use an oven to keep them crispy.
Make Ahead: You can prepare the filling a day in advance and store it in the fridge. Just wrap and fry when you’re ready for that crunch!
Troubleshooting: If your spring rolls are browning too quickly in the oil, lower the heat. Cooking them too fast might leave the insides raw while the outside burns.
Serving Suggestions
These Ultimate Crispy Veggie Spring Rolls shine on their own, but they can also be served alongside a light dipping sauce, fresh crunchy salads, or fragrant fried rice. For a lovely presentation, pair them with some homemade pickled veggies on the side. They’re perfect for family gatherings, potlucks, or just a cozy night in.
Variations & Substitutions
Feel free to mix things up! Here are a few ideas:
- Meaty Options: Perhaps you’d like to add bits of shrimp or crab for a seafood twist?
- Veggie Swap: Swap the taro for sweet potato or add bell peppers for a color and flavor burst.
- Spicy Kick: Stir in some chili paste or sriracha into the filling for an extra heat dimension.
- Seasonal Variations: During fall, try adding diced pumpkin or squash for a cozy, seasonal touch!
Nutrition & Storage Info
- Prep Time: 25 minutes
- Cook Time: 20 minutes
- Total Time: 45 minutes
- Yield: Approximately 12-14 spring rolls
- Estimated Calories: About 150 calories per spring roll (depending on the frying method)
- Storage Instructions: Store in an airtight container at room temperature for up to a few hours, in the fridge for up to 3 days, or freeze for up to 1 month.
FAQ Section
Can I freeze these spring rolls?
- Absolutely! Just make sure to wrap them well in plastic wrap or freeze them in an airtight container. Fry straight from frozen, adding a few extra minutes to the cooking time.
What can I use instead of soy sauce?
- Tamari or coconut aminos are great gluten-free alternatives if you’re avoiding soy.
Can I bake these instead of frying?
- Yes! Baking gives them a unique texture; just brush them lightly with oil before baking at 425°F for around 20 minutes.
How do I know when they are done frying?
- They will turn a lovely golden brown color. You can lightly press on them—if they are crispy, they are ready!
What if I don’t have rice paper wrappers?
- You can use flour-based spring roll wrappers, but the texture will vary slightly.
Can these be made ahead?
- Yes, you can prepare the filling ahead of time and assemble the spring rolls when you’re ready to cook them.
Are these spicy?
- Not if you follow the recipe as is! Adjust the pepper level based on your preference.
What’s the best oil for frying?
- Neutral oils with high smoke points, like canola or peanut oil, are perfect for frying.
How can I serve these spring rolls?
- Serve with sweet chili sauce, hoisin, peanut sauce, or your favorite dips.
Can I add meat to the filling?
- Yes, ground meat, shrimp, or even cooked chicken can be added for extra protein.

Conclusion
These Ultimate Crispy Veggie Spring Rolls are not just a treat for your taste buds; they’re a trip down memory lane, filled with joy and nostalgia. I encourage you to gather your friends and family and embark on this delicious adventure together. Your kitchen will soon be filled with the hearty crunch and satisfying flavors of these delightful rolls!
I’d love to hear how your spring rolls turn out! Share your thoughts or tweaks in the comments below, and check out more related recipes on my blog for even more yummy ideas. Happy cooking!

Ultimate Crispy Veggie Spring Rolls
Ingredients
Method
- Prepare the mushrooms: After soaking the dried shiitake mushrooms, squeeze out the excess water, and set them aside. In the same water, soak the glass noodles until softened (about 15-20 minutes).
- Mix the veggies: Chop the rehydrated mushrooms and combine them with julienned taro, cabbage, and carrots in a large mixing bowl.
- Add the noodles: Once the glass noodles are softened, drain them, cut into 2-inch pieces and toss them into your vegetable mixture.
- Sauté for flavor: In a pan, heat 2 tablespoons of neutral oil over medium heat. Add minced garlic and pepper, sautéing until golden and fragrant (about 2 minutes).
- Cook the vegetables: Add the vegetable mixture to the pan and cook, stirring frequently, until the taro is tender but not mushy (around 8-10 minutes).
- Season the mixture: Combine in the softened glass noodles, chopped cilantro, remaining soy sauce, sugar, and a splash of mushroom soaking water. Taste and adjust seasonings if necessary, then spread the filling on a plate to cool.
- Wrap it up: Prepare your spring roll wrappers according to package directions. Place a generous spoonful of filling in the center, fold the sides over the filling, and roll it tightly. Use a paste made from flour and water (or an egg) to seal the edges.
- Fry or bake: If frying, heat vegetable oil in a wok or deep pan until hot (about 350°F). Carefully add the spring rolls, a few at a time, frying until golden brown (approximately 2-3 minutes each side). For a healthier option, bake at 425°F until crispy, approximately 20 minutes, flipping halfway.
- Serve: Drain on a paper towel and serve immediately with sweet chili sauce for dipping.